A screen-by-screen manual: jobs, readings from your own meter, photos, notes and the branded PDF report.
Written by Systemic Studios, the makers of Tower Aim. Follow it in order on your first job, or jump to the screen you need.
Tower Aim is a one-off purchase. Installer is an optional in-app subscription.
QUICK START
The short version.
Read this first, then follow the screens below.
QUICK START
Installer in one minute
Tap Jobs, then New job. Add the customer and the job site, then open the job to record before and after readings from your own meter, Before, During and After photos, and notes or dictation. Tap Create report, check your business details, choose the photos, then tap Preview & share report. Mark the job done.
BEFORE YOU START
Before you start
Installer needs Tower Aim, a one-off purchase, and an Installer subscription. No account or sign-in is needed. The screens shown are from an iPhone; Android uses the same layout and button names. Roof work is dangerous: set up the job on the ground and never use your phone while climbing.
ON THIS PAGE
Contents.
Jump to the screen you need. On your first job, start at screen 01.
The report includes your business details, the job site, the saved transmitter with its predicted reception, your recorded readings, your notes and the photos you select.
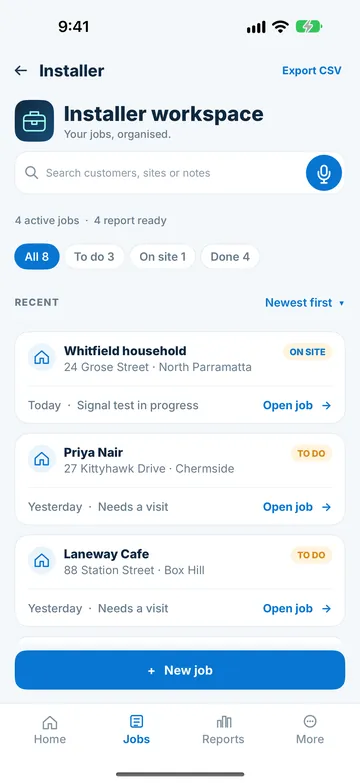
Every job lives in the Installer workspace. A job is To do, On site or Done; done jobs show as Report ready in the list.
01Jobs by status
Step 1
Subscribe from the Installer button at the top of the Home screen, then tap Jobs in the bottom bar. The bottom bar appears once you subscribe.
Step 2
Filter the list with All, To do, On site and Done. The counts above show active jobs and reports ready.
Step 3
Search customers, sites or notes by typing, or tap the microphone to dictate your search.
Step 4
Change the order with Newest first.
Step 5
Tap Open job on a job card to open it, or New job to start one.
Step 6
Tap Export CSV at the top right to export all your jobs as a spreadsheet: customer and job names, addresses, status, transmitter, notes and readings. Share or save it from your phone.
SCREEN 02
Create a new job
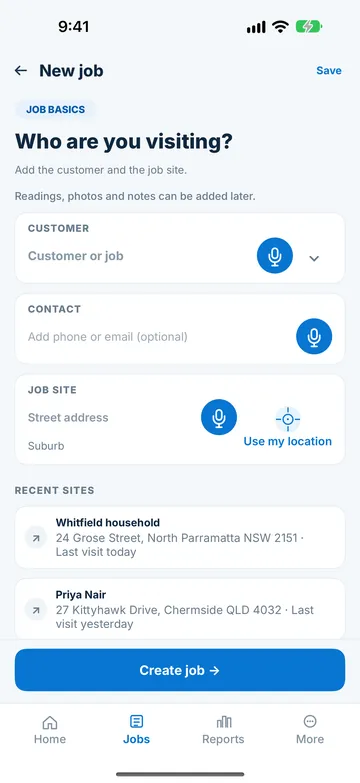
Add the customer and the job site. Readings, photos and notes can be added later.
02New job
Step 1
Tap New job.
Step 2
Under Customer, type the customer or job name, tap the microphone to dictate it, or tap the arrow to pick a recent customer.
Step 3
Under Contact, add a phone number or email (optional).
Step 4
Under Job site, enter the street address and suburb, tap Use my location, or pick one of your Recent sites.
Step 5
Check the transmitter selected in Tower Aim: the job saves it. Typing an address doesn't change the transmitter, and you can change it later from the job.
Step 6
Tap Create job.
SCREEN 03
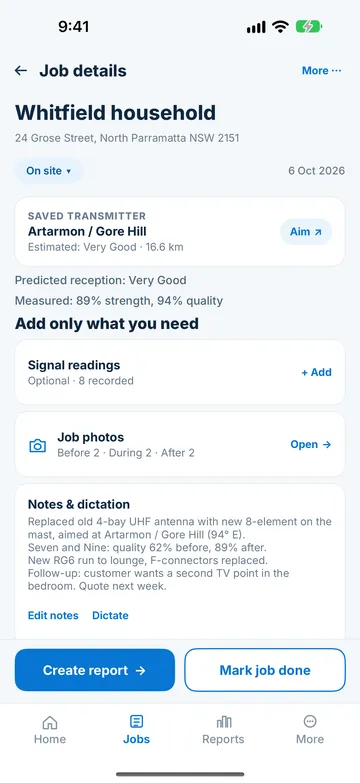
Job details
One screen per job, with the transmitter, readings, photos and notes. Add only what you need.
03Job details
Step 1
The Saved transmitter card shows the transmitter, its estimated reception and the distance. Tap Aim to open the compass pointed at it, then check reception on the TV.
Step 2
To change the tower, tap More, then Edit job details, then Change tower, and pick one of the nearby transmitters.
Step 3
Tap the status under the address to set To do, On site or Done.
Step 4
Tap + Add next to Signal readings to record readings.
Step 5
Tap Open next to Job photos to see or add photos.
Step 6
Tap Edit notes or Dictate under Notes & dictation.
Step 7
When the work is finished, tap Create report, then Mark job done to set the job to Done.
SCREEN 04
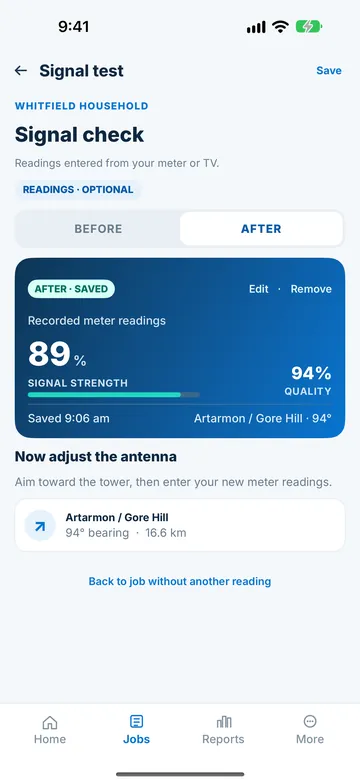
Enter before and after readings from your own meter
Signal check records the readings you take with your own test equipment, or from the TV's signal screen: signal strength and quality, as percentages. The phone does not measure TV signal. A job can keep up to 12 readings.
04Readings from your own test equipment
Step 1
On the job, tap + Add next to Signal readings.
Step 2
Choose Before, tap Enter before reading, type the signal strength (%) and quality (%) from your meter, then tap Save reading. You can also add the channel, mux or frequency, and a note.
Step 3
Aim the antenna toward the tower. The bearing and distance are shown under Now adjust the antenna.
Step 4
Tap Enter after reading, type your new readings, then tap Save reading.
Step 5
To correct a saved reading, tap Edit or Remove. Tap Back to job without another reading when you're done.
SCREENS 05 AND 06
The photo record: Before, During and After
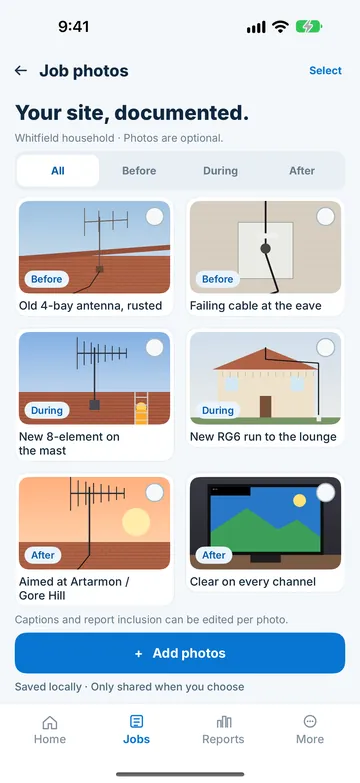
Photos are optional and kept inside the app, not in your camera roll. They are only shared when you choose.
05Photo record
06Add photos by stage
Step 1
On the job, tap Open next to Job photos.
Step 2
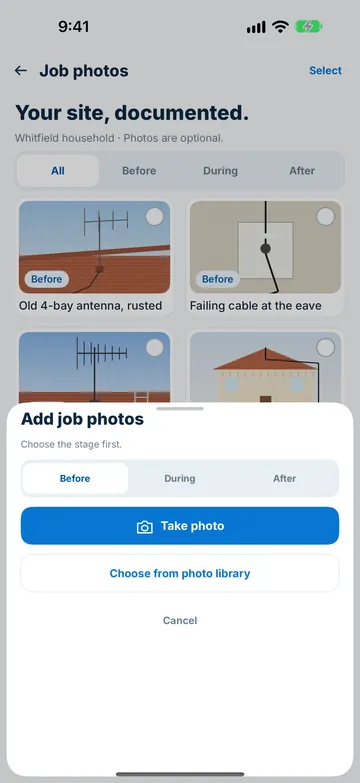
Tap Add photos, then choose the stage first: Before, During or After.
Step 3
Tap Take photo to use the camera, or Choose from photo library. Add a caption if you like, choose whether to include the photo in the customer report, then tap Save photo.
Step 4
Filter the gallery with All, Before, During and After.
Step 5
To change a photo later, tap it to open Review photo. Change the stage, the caption or Include in customer report, or delete the photo.
Step 6
Tap Select to delete several photos at once.
SCREEN 07
Notes and dictation
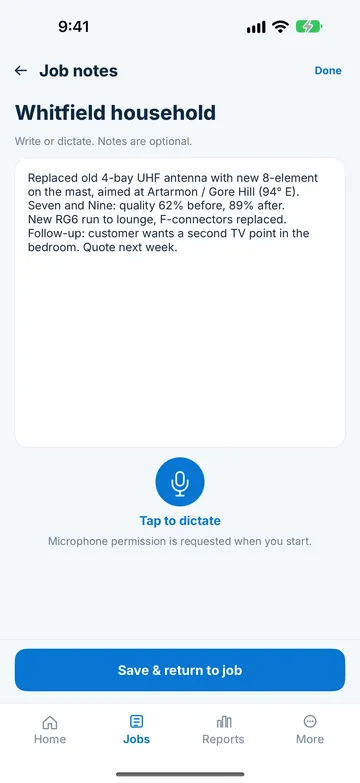
Write or dictate. Notes are optional.
07Notes & dictation
Step 1
On the job, tap Edit notes, or Dictate.
Step 2
Type in the notes box, or tap the microphone (Tap to dictate). The first time, the app asks for microphone access; on iPhone it also asks for speech recognition.
Step 3
If you declined access, tap Open Settings in the app to turn it back on. You can always type instead.
Step 4
Tap Save & return to job.
SCREEN 08
Build and share the branded PDF report
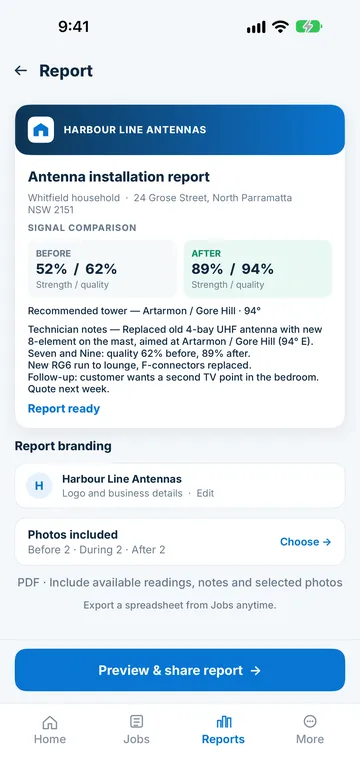
The report includes your business details, the job site, the saved transmitter with its predicted reception, your recorded readings, your notes and the photos you select.
08Branded PDF report
Step 1
On the job, tap Create report.
Step 2
Check the preview: your business name and logo, the customer and site, the before and after signal comparison, the recommended tower and your notes.
Step 3
Tap Report branding (Logo and business details) to add your business name, logo, phone, email, website, licence or business number, and optional warranty or terms. Branding is saved on your phone and reused for every report. You can also open it from More, then Report branding.
Step 4
Under Photos included, tap Choose to switch each photo in or out.
Step 5
Tap Preview & share report. In the preview, tap Share to send the PDF with your phone's share options, Save to keep a copy, or Print.
FINER TERRAIN
Download (or delete) the more detailed terrain map
Installer adds a more detailed terrain map for the terrain line of sight. Trees and buildings are not included.
Step 1
After you subscribe, the finer terrain map downloads by itself when your phone is on Wi-Fi. On mobile data it waits.
Step 2
Progress shows on the Installer plan screen and on a card in Jobs. From that card you can choose to download on mobile data instead.
Step 3
To start it yourself, open Settings (the slider icon at the top of Home, or More, then Settings), tap Region packs under Data, then tap Download on the Finer terrain card.
Step 4
To delete it, tap Remove on the same card. Tower Aim then uses the standard terrain map, and the finer map doesn't download again by itself.
SUBSCRIBE AND RESTORE
Subscribe to Installer, or restore it
Installer needs Tower Aim. It is an optional subscription, monthly or annual, that renews automatically. App Store and Google Play subscriptions are separate: each works on its own platform.
Step 1
Get Tower Aim from the App Store or Google Play. It is a one-off purchase.
Step 2
On the Home screen, tap Installer at the top right to open the Installer plan screen.
Step 3
Choose Monthly or Annual, then tap Subscribe. Payment is charged to your Apple Account or Google Play account.
Step 4
On a new or reset phone, sign in with the same Apple Account or Google account, open the Installer plan screen and tap Restore at the top, or Restore purchases. Subscribers also find Restore purchases in More.
MANAGE OR CANCEL
Manage or cancel your subscription
Installer is managed through your store's subscription settings, not on our website.
Step 1
In the app, tap More, then Manage subscription. This works on iPhone and Android.
Step 2
On iPhone you can also go to Settings, your name, Subscriptions.
Step 3
On Android you can also open the Google Play app, tap your profile icon, then Payments and subscriptions, then Subscriptions.
Step 4
The subscription renews automatically until you cancel. On iPhone, cancel at least 24 hours before the end of the current period.
Step 5
If you cancel, Installer stays on until the end of the period you have paid for, and Tower Aim keeps working as before. Your jobs stay on your phone and are there again when you resubscribe. On Android, deleting the app does not cancel the subscription.
GET STARTEDTOWER AIM INSTALLER
Get Tower Aim, then add Installer.
Tower Aim: TV Antenna Finder · TV Aerial Pointer & Compass
Installer is an optional subscription inside Tower Aim, for antenna installers, electricians and AV professionals.
Tower Aim is a one-off purchase. Installer is an optional in-app subscription.
Jobs by status
Organise customer jobs by status, with customer details and the installation site.
Readings from your meter
Signal readings before and after, entered from your own test equipment. The phone does not measure TV signal.
Photo record
Before, During and After photos from the camera or photo library.
Notes and dictation
Type notes or dictate them on site.
Client-ready PDF reports
With your business logo and contact details, shared on site.
Finer terrain
A more detailed terrain map for the terrain line of sight, as a download. Wi-Fi recommended.
No. A phone cannot measure TV signal. Signal check records the readings you take with your own test equipment, or from the TV's signal screen, as signal strength and quality percentages. Tower Aim's reception rating is an estimate, not a measurement.
Do I have to add readings, photos and notes to every job?
No. Readings, photos and notes are all optional. Create the job with the customer and the job site, then add only what you need, now or later.
How do I add my logo and contact details to reports?
On the report screen, tap Report branding (Logo and business details), or tap More, then Report branding. Add your business name, logo, phone, email, website, licence or business number, and optional warranty or terms. Branding is saved on your phone and reused for every report.
Can I choose which photos go in the report?
Yes. On the report screen, tap Choose next to Photos included to switch each photo in or out. You can also tap a photo in Job photos and change Include in customer report.
Why does dictation ask for microphone access?
Dictation needs the microphone, and on iPhone also speech recognition, so the app asks the first time you dictate. If you declined, tap Open Settings in the app to turn access back on. You can always type instead.
Where are my jobs, photos and notes stored?
On your phone. Tower Aim doesn't upload your jobs, photos or notes; they stay on your phone until you share them. Photos are kept inside the app, not in your camera roll.
Will my jobs move to a new phone?
Tower Aim has no account or cloud sync. Your jobs, photos and branding are included in your phone's own backup, so restoring a backup to a new phone can bring them across, depending on your backup settings. Restore your subscription with Restore on the Installer plan screen.
Do I need Wi-Fi for the finer terrain map?
Wi-Fi is recommended. After you subscribe, the finer terrain map downloads by itself when your phone is on Wi-Fi. If you delete it, Tower Aim goes back to the standard terrain map.
How do I cancel Installer?
In the app, tap More, then Manage subscription. You can also use your store's subscription settings: on iPhone, Settings, your name, Subscriptions; on Android, the Google Play app, then your profile icon, Payments and subscriptions, Subscriptions. On Android, deleting the app does not cancel the subscription.
What happens if I cancel?
Installer stays on until the end of the period you have paid for, and Tower Aim keeps working as before. Your jobs stay on your phone and are there again when you resubscribe.
Tower Aim is a one-off purchase. Installer is an optional in-app subscription.
 Systemic Studios